
Installation and Configuration of Contabo Cloud Automation for WHMCS
This tutorial will show you how to successfully install and configure Contabo Cloud Automation for WHMCS. We will guide and help you step by step through the whole process.
Downloading and Uploading to WHMCS
- Access the client area at https://secure.whmcsmodule.net/ to download the module.
- Extract the downloaded module files to your local environment.
- Upload the entire 'modules' folder to the main directory of your WHMCS installation.
Obtaining API Key from Contabo
- Sign in to your Contabo Customer Panel at https://my.contabo.com/account/login.
- Navigate to the API section from the menu on the left.
- Click on Send Link within the API page to initiate the process of setting or resetting your password.
- Check your email inbox associated with your Contabo account. Follow the instructions to set your API password. Remember, your password should only include the characters '@' and '#', and no other special characters.
- After successfully setting your API password, make note of the API Password, ClientId, Client Secret, and API username provided.
Activating Module in WHMCS
- Navigate to Configuration > System Settings > Addon Modules in your WHMCS admin area.
- Locate and select "Contabo Cloud":
- Click on "Activate" to enable the module.
- Then click on "Configure" to access module settings.
- Enter the license key provided during module download.
- Configure Access Control settings as per your requirements, ensuring Administrator access is set.
- Optionally, disable specific Custom OS options from appearing in the client area.
- Choose to automatically retrieve plans if they don't load within Product/Services > Module settings.
- Save your changes after configuring all necessary settings.
Adding API details
- Go to Addons -> Contabo Cloud in your WHMCS admin panel.
- Click on the "Add Project API Key" button.
- Enter a descriptive Name for the API key for easy reference.
- Fill in the API Password, ClientId, Client Secret, and API username that you obtained earlier from the "Obtaining API key from Contabo" section.
Now we have scuccessfully Installed and Configured the module.
Creating / Editing a WHMCS Product
- Navigate to Configuration > System Settings > Products/Services.
- Click on "Create Product Group".
- Enter a name for the Product Group and configure other settings as needed, then click "Save Changes".
- Now, create a new product.
- Configure the following details on the next page:
- Product Type: Select "Other". Choosing "Other" avoids prompting customers for details like Hostname, Password, NS1 & NS2 prefixes during the order process. Selecting "Server/VPS" would require these details.
- Product Group: Choose the product group previously created.
- Product Name: Enter the name of your product.
- Module: Select "Contabo Cloud Automation".
- Create as Hidden: Keep this option off.
- Click "Save Changes" after setting up the required fields.
- On the next page:
- Verify the Product Type.
- Select the appropriate "Welcome Email" (e.g., Droplets Welcome Email).
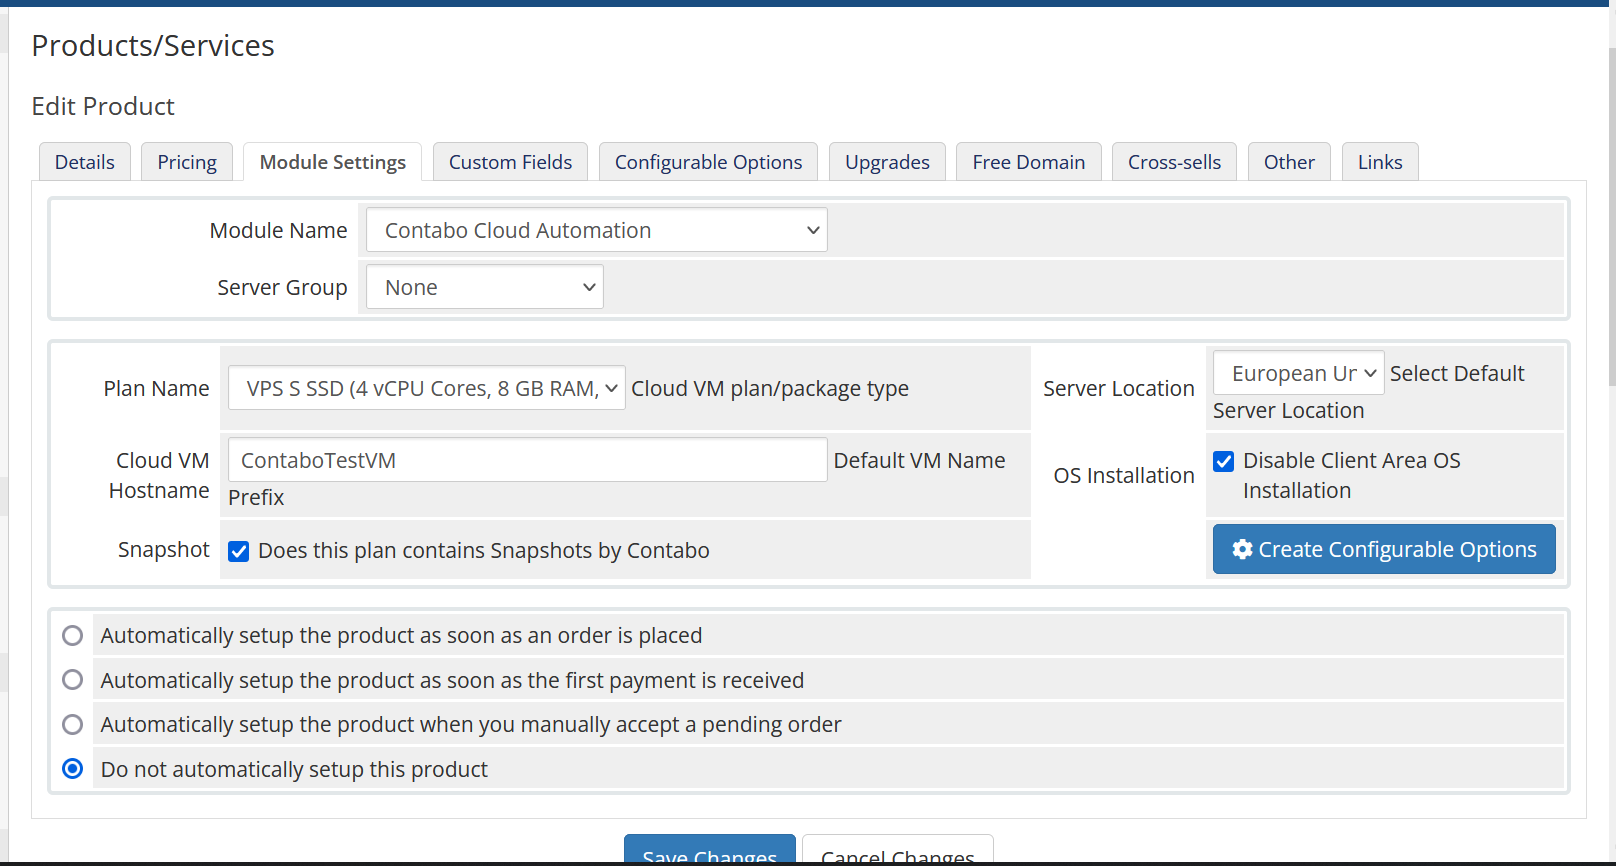
- Navigate to the "Module Settings" tab.
- In the "Module Settings" tab, configure the necessary details.
- Ensure you click on "Create Configurable Options", which will streamline manual activities required for Configurable Options settings in the next step.
If Custom Plans selected then:
- Click on Save Changes and then go to Custom Fields Tab
- Fill the details like below which is for VPS Plan 1 (https://api.contabo.com/#tag/Instances/operation/createInstance) to allow your user to select the HDD type either SSD/ NVMe, do not change the Name before the | symbol and feel free to change “Storage Type” to your requirement
- Name: productId|Storage Type
- Type: Drop Down
- Description: Select your disk type (SSD/NVMe)
- Select Options: V92|SSD,V91|NVMe
Or via Configurable Options:
- Name: productId|Storage Type
- Type: Drop Down
- Select Options: V92|SSD, V91|NVMe like that
*The Storage Plans (https://contabo.com/en/storage-vps/) and VDS Plans (https://contabo.com/en/vds/) must be created as separate products because their configurations do not align and cannot be managed via configurable options.
According to the API (https://api.contabo.com/#tag/Instances/operation/createInstance), each product name that includes Storage (e.g., VPS 10 Storage, VPS 20 Storage, VPS 30 Storage, VPS 40 Storage, VPS 50 Storage) as well as all VDS Plans (VDS S, M, L, XL, XXL) should have its own distinct group and corresponding product. However, products with NVMe & SSD configurations can be grouped together as a single product due to their similar configurations.*
As of June 22, 2025, this setup is applicable, but it may change in the future depending on the plans Contabo introduces.
Configurable Options
- Navigate to System Settings -> Configurable Options (Note this step has to be followed for each and every product you create as Contabo charges different process for different product).
- Locate and edit the configurable options relevant to your newly created product.
- Configurable Option Volume - vmOSimage|Operating System
- For this adjust the prices for Windows OS
- Configurable Option – location|Server Location
- As you know EU region price is free and Contabo charges prices for different region so edit the location|Server Location option and change the prices suitable for you
- Configurable Option - license|License
- This is for cPanel license etc, if you wanted to sell you can adjust the price or you can delete the section completely
Viewing Existing VPS/ Secrets/ Assigning VPS to customer
- Click on the Server Icon () to view a list of all existing and created VPS instances.
- Click on the Key Icon () to access the passwords for the VPS instances.
- To view a specific VPS, click on the Server Icon.
- Click on the Plus Icon () to import this VPS into your WHMCS.
- After importing, navigate to Clients > View/Search Clients and find the customer you wish to assign this VPS to.
- Edit the product associated with the user, then select the imported VPS from the Servers dropdown menu to assign it.
Note: If you encounter an "Unauthorized" error after providing your API details, first ensure that your API password does not contain any special characters other than @. If this doesn't resolve the issue, please open a support ticket with Contabo, as further assistance will need to come from their support team.