
Installation and Configuration of OVH VPS Module for WISECP
This tutorial will show you how to successfully install and configure the module for WISECP. We will guide and help you step by step through the whole process.
Table of different region to generate the API Keys
Reference: OVH Official Reference Page
| Region Name | URL |
|---|---|
| ovh-us (OVH US) | https://api.us.ovhcloud.com/createToken/index.cgi?GET=/*&PUT=/*&POST=/*&DELETE=/* |
| ovh-ca (OVH North America) | https://ca.api.ovh.com/createToken/index.cgi?GET=/*&PUT=/*&POST=/*&DELETE=/* |
| ovh-eu (OVH Europe) | https://eu.api.ovh.com/createToken/index.cgi?GET=/*&PUT=/*&POST=/*&DELETE=/* |
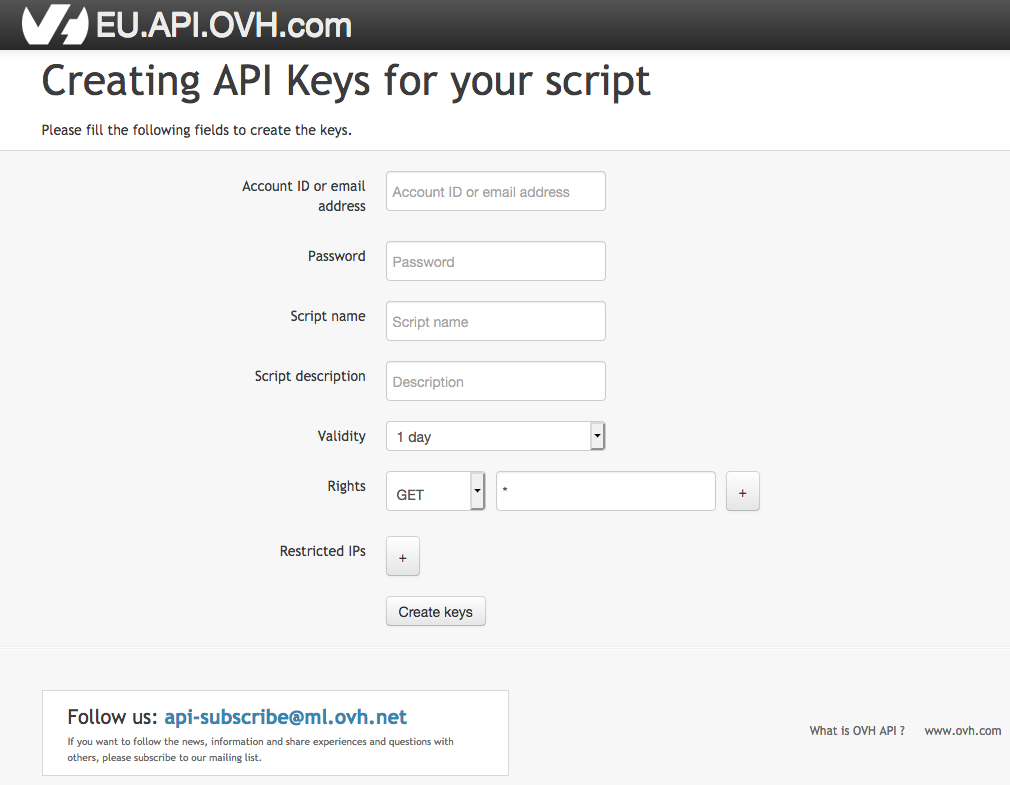
Create your app keys/ Obtaining API Keys
- Any application that wants to communicate with the OVHcloud API must be declared in advance.
- To do this, click the above links based on the region
- Fill in your OVHcloud customer ID, password, and application name. The name will be useful later if you want to allow others to use it.
- You can also add a description of the application and a validity period.
- The Rights field allows you to restrict the use of the application to certain APIs.
Installing and Activating Module in Blesta
- Extract and upload the ovhvps folder to /path-to-your-wisecp/coremio/modules/Servers
- Login into your WISECP Admin Portal
- Go to Services > Hosting Management > Server Settings
- Click on Add New Server
- In Next page
- a. Hostname – Give any name you want for your convenient (Based on your region) eg: OVH CA VPS
- b. Server Automation Type – Select OVHVps
- c. IP Address – Give the region example your regions
- d. Username – Provide module license key obtained from WHMCSModule Networks
- e. Password – give your region name examples (any one based on your location): ovh-ca / kimsufi-ca/ kimsufi-eu / ovh-eu/ ovh-us / runabove-ca / soyoustart-ca / soyoustart-eu
- f. Access Hash – Give your API key obtained from the portal as below json format where you need to change the bold text with your values
- {"appkey": "yourApplicationKey", "appsecret":"yourSecretKey", "conskey":"yourConsumerKey", "region":"asYousetinPasswordfield"}
- g. Update Change/ Add Change – Once everything is set click on it to update/ add
Creating/ Modifying Packages
- Now navigate (Services -> Hosting Management -> Dedicated/VPS Packages -> And click on Create New Package or edit your packages)
- Navigate to Core tab and select Single Server then from drop down select the previously created server
- a. Package Name – Give your required name
- b. In Cores Tab –
- i. Subsidary - Select the it to populate that location based VPS Plans
- ii. Image type – free or Licensed, licensed is for Windows/ cPanel etc
- iii. VPS Prefix – Give a name as it will be identified as hostname (required)
- iv. Payment Method – payPal or anything but make sure you have auto payment setuped at OVH else VPS auto creation will not work
- v. Flavor – Is you plan name
- vi. Location – Select the location in which VPS will be created
- vii. Default OS – select any default os for creating VPS
Importing and Assigning Existing servers to customer
- First go to Services > Hosting Management > Server Settings
- Click on Import tab and click on List Results to list down all the servers
- Here you see all the servers even you can assign them to your users